Here you will learn about alternative automation workflows, software and services which are compatible (or might be compatible) with swapmod.
Using start- and end-gcode
This approach means that you are not really using an automation where you print multiple plates in a row but take advantage of the plate swapping system to keep your printer always ready for the next job. This can be achieved by adding this gCode sequence to the end-gCode section in your slicer. Following sequence will eject a plate and pull a new one from the magazine:
swapmod A1m Kit – plate swapping gCode…
;plate-swap start
G0 X-10 F5000;
G0 Z175;
G0 Y-5 F2000;
G0 Y186.5 F2000;
G0 Y182 F10000;
G0 Z186;
G0 Y120 F500;
G0 Y-4 Z175 F5000;
G0 Y145;
G0 Y115 F1000;
G0 Y25 F500;
G0 Y85 F1000;
G0 Y180 F2000;
G4 P500; wait
G0 Y186.5 F200;
G4 P500; wait
G0 Y3 F3000;
G0 Y-5 F200;
G4 P500; wait
G0 Y10 F1000;
G0 Z100 Y186 F2000;
G0 Y150;
G4 P1000; wait
;plate-swap start
swapmod A1m STL – plate swapping gCode…
;plate-swap start
G0 X170 F5000;
G0 Z180 F2000;
G0 Y186.5 F3000;
G0 Z186 F2000;
G0 X188 F5000;
G0 Z180;
G4 S1;
G0 Y150 F200;
G0 Y-6 F2000;
G0 Z186 F5000;
G0 X170;
G0 Z180 F5000;
G0 Y150 F2000;
G0 Y15 F3000;
G0 Y180 F2000;
G0 Y186.5 F500;
G0 Y5 F5000;
G0 Y-6 F200;
G4 S1;
G0 Y5 F500;
G0 Y100 F5000;
;plate-swap start
To make it more secure you can also add a loading-only sequence to the beginning of your start-gCode. Following sequence will load a plate if your heat-bed is empty and do nothing when there is already a plate on it.
swapmod A1m Kit – plate loading only gCode…
;plate-load start
G91;
G0 Z50 F1000;
G0 Z-20;
G90;

G28 XY;

G0 Y-4 F5000;
G0 Y145;
G0 Y115 F1000;

G0 Y180 F5000;
G4 P500;
G0 Y186.5 F200;
G4 P500; wait
G0 Y3 F15000;
G0 Y-5 F200;
G4 P500; wait
G0 Y10 F1000;
G0 Y20 F15000;
;plate-load end
swapmod A1m STL – plate loading only gCode…
;plate-load start
G90;
G28;
G0 Z30 F5000;
G0 X-10;

G0 Y-6 F2000;
G0 Y150;
G0 Y100;
G0 Y186.5;
G0 Y-6;
G4 S1;
G0 Y5 F500;
G0 Y100 F5000;
;plate-load end
This will ensure that your printer will always try to load a plate before starting. When plate is already placed this code will do nothing.
So now each time you start the print job from your slicer your printer will load a new plate (when not already placed), print the job, eject the plate, load a new one and wait for your next print.
Using swapnow file
This approach is similar to the previous one but with the difference that you don’t need to modify your slicer settings an use it to remotely control your swapmod from almost any device.
The idea is simple. There is an empty 3MF file with no geometry inside. It contains only a snippet of a gCode which performs the plate swapping procedure.
To proceed, please home the axis of your printer.
Now download a swap-now file for your slicer:
Swap-now for swaomod A1M Kit
Swap-now for swaomod A1M STL
(👉 if you are looking for custom swap-now files – other nozzle and material – please scroll down to the end of this chapter)
Once downloaded, open it in your slicer and “print”, just like you have done with the swapmod self-test file earlier. Your printer will perform a plate swapping procedure.
Now where you have sent the file to your printer you can always trigger it using your slicer or BambuLab mobile app.
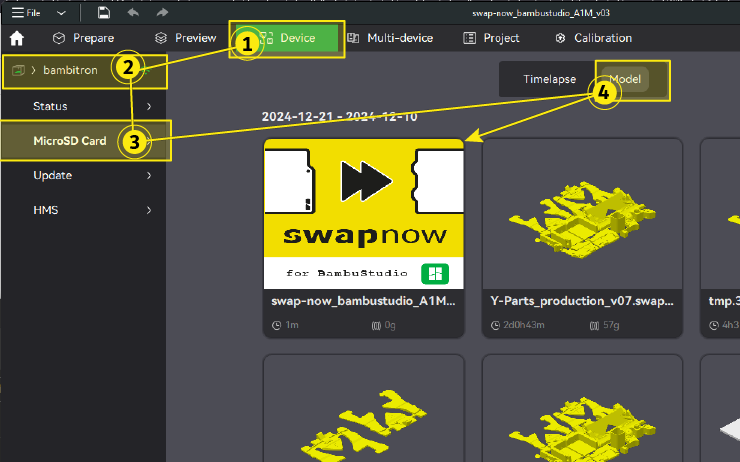
To start it from your Slicer, simply click on Device-tab, choose your printer, click on MicroSD Card, than on Model and find the swapnow file in the list. On mouse over you will see the Print button.
To re-start the swap-now file from your printer‘s SD card using a BambuLab mobile app you need to do following:
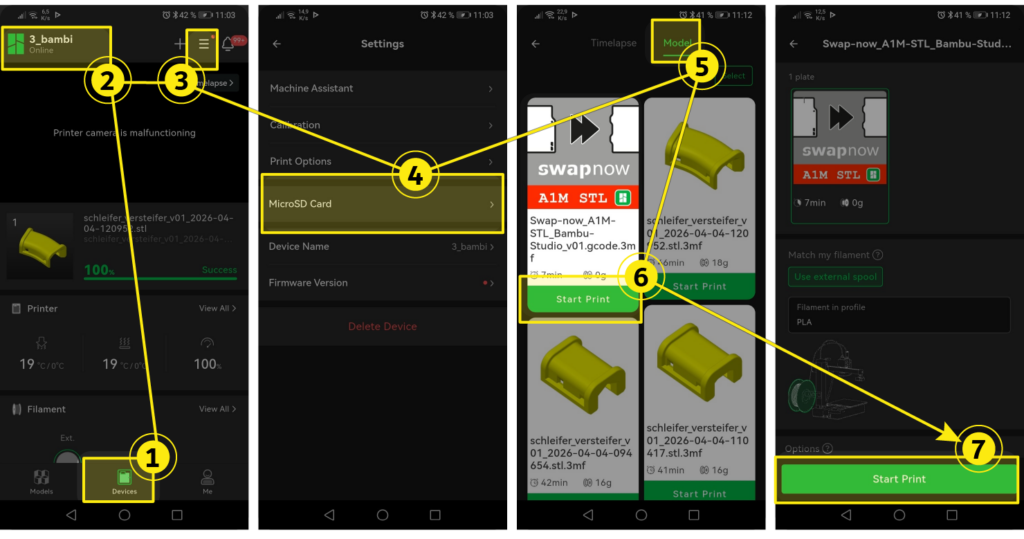
Click on “Devices” (see point 1 on image below). If you have multiple printers, make sure the right printer is selected (2). Now click on Settings-Menu icon in the upper right corner (3), then on “micro SD card” (4). Switch to “Models” tab (5), find the swap-now file, hit “Start print” (5) and confirm (6).
Please note, if you have multiple printers, you will need sending the file to each of them in order to been able accessing it this way using slicer.
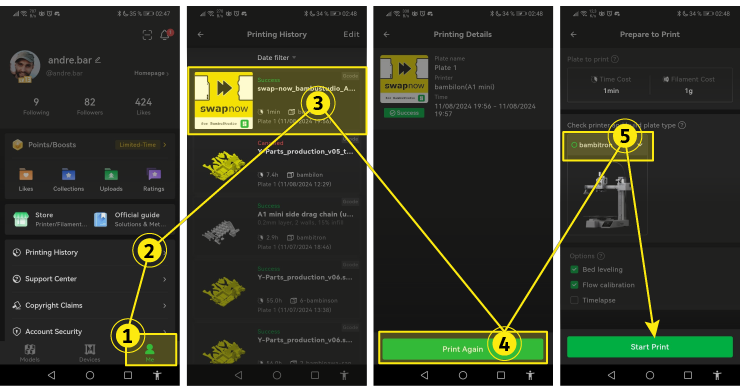
In case of BambuLab mobile app you can also use the cloud history to “reprint” the swap-now file. You just need to “print” the swap-now file once while your printer is logged into the cloud and the file will remain in your accounts history where you can access it at any time.
To execute the swap-now file using the printing history open the BambuLab mobile app, navigate to your profile (Me), click on Printing History, find swapnow file in the file list, choose Print Again, select your printer and click Start Print.
Please note: that it is recommended to execute the “swapnow” file after the print has been finished (or canceled) rather than after turning the printer off and on. After a power outage, the printer will lose its z-home position and will need to find it the “hard way” by moving all the way up on the z-axis. This
method works, but it is noisy and may not be as healthy for the electronics if done frequently.
🚨If your printer refuses starting swap-now file because of nozzle or filament mismatch…
Our regular swap-now files are set for printer equipped with a default 0.4 nozzle and PLA. For different setups some adjustments might be needed.
For example, if you trying to run this swap-now file, but your printer is equipped with a 0.6 mm nozzle, than you will probably receive an error. This is because the printer is checking nozzle diameter settings inside the file and refuse to run in case of mismatch. Also when you are using AMS (on latest firmware) and only PETG is loaded, it might also cause similar mismatch error. To solve this issue you need to create a custom file for your desired use-case. This is easy, but requires some extra steps.
To proceed you will need some program to open a 3mf file, which is in reality a zip-archive containing multiple files and folders. You can use you a default zip program on you operating system. However we would recommend using 7-Zip – a free open source tool.
- Open your slicer and create a project with your desired setup. For instance one with 0.6mm nozzle and PETG material.
- Add a cube and slice the file.
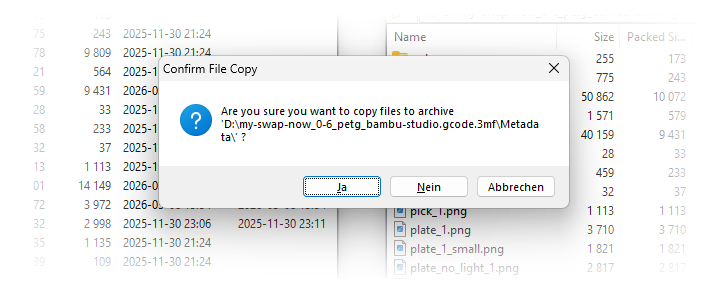
- Select “Export sliced file” in the upper right corner and choose where to save the exported file. You can name it corresponding to your needs (e.g. “my-swap-now_0-6_petg_bambu-studio.gcode.3mf”). This file will serve as a template.
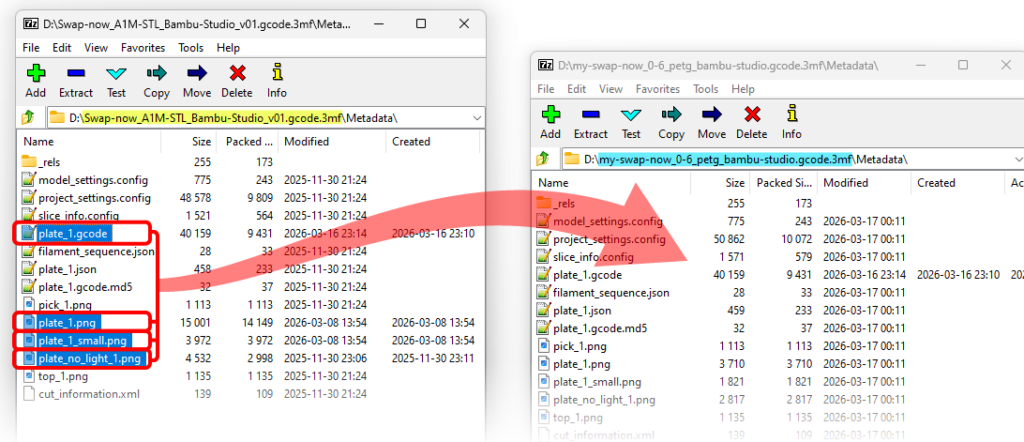
- Open this file with 7-Zip tool (or other zip program on your OS) and navigate to “Metadata” folder. Let the window open.
- Now do the same procedure with the original downloaded swap-now file for BambuStudio – open and navigate to “Metadata”.
- Placing both opened windows side by side (see pictures below)
- find following files in the original Swap-now file:
- pale_1.gcode
- plate_1.png
- plate_1_small.png
- plate_no_light_1.png
- Drag and drop these files to your exported template.
- Confirm the dialogue and close both 3mf files.

Now you have a custom swap-now file which you can use for your setup without getting errors by the slicer or printer.
Using printer management services
There are multiple cloud and network based services which can be used with swapmod in order to manage the automation. Some tools can monitor multiple printers, sending a clearing (swapping) GCODE once the print job is finished and start the next one from the queue. Other tools can even be connected to a online shop and send a print job to your printer when orders come in. These services are mostly cloud and subscription based managing tools. Not all are supporting BambuLab right now, but many are working on the implementation. Some of them will require additional hardware, other just need an internet connection. Here is a list of some such tools, which you can discover:
This list will grow as there are a lot of development right now. I have not yet tested all these tools but I’m in contact with the developers and know about the functionality of their software and potential compatibility with swapmod. Such tools and services could bring a lot of comfort when used with automation like swapmod. Other than swaplist.app these tools can monitor your printer and allow live management of your printing queue and manage your printing schedule for large number of printers simultaneously. Feel free to test these services with swapmod. All you need is the plate-swaping gCode sequence you can find above.